Termini e abbreviazioniFONTEAdding Threads: Add threads whenever you run out of thread or need to cut out a mistake. There are several methods to add thread to rings and chains: cut and tie, a weaver’s knot, looping two threads together and tatting over one thread tail in the subsequent ring (element) and the other thread tail in the subsequent chain (element). My favorite method is the loop-over connection for rings and weaving threads to add thread to a chain. (See LOC.)
Active Shuttle (AS): The current shuttle used to form the double stitch or other stitches.
I prefer the term “active shuttle” instead of the term “working shuttle” because don’t all shuttles work?
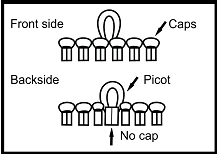
Backside: Opposite side of the front side. You can determine the backside by looking at a picot. On the back side, a picot will not have a cap.
backside
 Ball Thread (BT)
: This is the left hand thread or core thread. Or it could refer to the ball of thread itself.
Bare Thread Space (BTS): This is an unworked thread space where the thread is exposed without a double stitch hanging on it. It is used in half-closed rings, mignonette, and for other decorative purposes.
Bead (B): Beads are often added at the point where picots would have appeared.
Using a shuttle, add a bead to a ring.
Beads are placed on the shuttle before tying two threads together to begin tatting.
Before circling the left hand thread to make the ring, bring the required number of beads up onto the left hand thread. Hold beads behind the middle finger. Finish circling the thread to the pinch. The beads are ready to take the place where a picot would have appeared. Tat to the next place on the ring where a bead needs to appear. Bring a bead to the place where a picot normally appears. Snug it up against the doubles stitches. Hold the bead in the pinch while making a new DS. Snug up new DS against bead. When you are finished placing all of the beads for your pattern, close the ring.
Using a shuttle, add a bead to a chain.
Place required number of beads on Ball Thread. Tat to the point where a bead is required. Push up a bead from Ball Thread, tat a DS and snug it up to stabilize the bead.
Blade: There are two blades on a shuttle. They are the canoe shaped parts on either side of the center block. Blades can be made of tortoise shell, mother of pearl, plastic, metal, ivory, wood, and bone.
Blocking: After tatting your article, make sure it is flat and clean. Wash the tatted article in a mild soap and warm water. Use distilled water if your water supply has an abundance of minerals. Then, with rust-proof pins, pin lace out on a pinning board. I like to use T-pins to open up the picots.
Cap: A cap is the bump above the legs of a double stitch. I prefer the term “cap” over the term “crown” as I consider tatting an egalitarian sport. It is an inexpensive pursuit, available to everyone. Even children can finger tat with a string and without a shuttle or needle, using only a string.
cap
 Chain
Chain (Ch): A chain is made with two threads: a Ball Thread and a Shuttle Thread. The shuttle makes the double stitch. And the double stitch is suspended upon the Ball Thread.
To make a chain, tie two threads together with a square knot. Hold this knot between your left index finger and thumb. Wrap the LHT over your middle and ring finger, then under your pinky finger. Wind thread a couple of times to secure. Hold LHT taut. Hold shuttle thread in the right hand. Use the shuttle to make the DS. (See DS)
The reason I chose “Ch” rather than “C” for chain is so it couldn’t be confused with “Center” which is sometimes abbreviated with “C.”
Close (Cl): Unless otherwise specified by the instructions, all rings and chains are closed.
Clover: Clovers are composed of three consecutive rings grouped together. The center ring may be larger than the side rings. This is similar to a trefoil. However, the rings in a trefoil are uniform in size.
Continuous Thread Method (CTM): This can mean two things.
When winding a shuttle, this means do not cut the thread from the ball to the shuttle.
When tatting an article, CTM is a strategy to move from round to round without cutting and tying the threads. Split rings, split chains, and mock picots are common CTM techniques.
Core Thread: a.k.a. foundation thread or running thread. Normally, this thread is found in your shuttle, needle, or right hand side. It is the center thread upon which the DS hangs.
Double Stitch (DS): This stitch is the basis of tatting. Actually, a DS is a Lark’s Head knot.
The shuttle moves under the Left Hand Thread (LHT) which is held taut, then out (over) the LHT to make the First Half Stitch of the double stitch. Then the shuttle moves over and under (out) the LHT to form the Second Half Stitch of the DS. These two half stitches make one Double Stitch.
Flawless Front (FF): This term provides an abbreviation for front side/backside tatting. It allows for shorter abbreviated patterns.
The front side has all of the caps of the DS facing you. The backside is identified by the missing a cap where a picot occurs. If tatting for a competition, make sure caps are facing front. Also, this means whenever the backside faces you, you will need to tat RODS.
flawless-front
 Flipped
: This means the half stitch loop is transferred from below the Left Hand Thread to above the LHT. This occurs in the First and Second Half Stitch.
I prefer the word “flipped” instead of “turned” because “turn” can be confused with “Turn Work” (to its opposite side). What do you think?
Half Stitch (HS): Two half stitches make up one double stitch. First Half Stitch (1HS) is an under stitch. Second Half Stitch (2HS) is an over stitch. See Double Stitch.
Join (J): There are two kinds of joins: an up join and a down join. It joins two elements (like a ring or chain) via a picot.
When the backside of a tatted article is facing you, use an up join. Place the thread beneath the picot, i.e., on the front side. Using a crochet hook, pull the thread up through the picot to form a loop. To secure join, insert the shuttle though the loop in a backside to front side direction.
When the front side is facing you, use a down join. Place the thread above the picot, i.e., the front side. A crochet hook pulls the thread down through the picot to the backside to form a loop. Insert the shuttle through the loop in a backside to front side direction.
Josephine Chain (Spiral) (JC) or (JS): A chain made up of repeated 1HS or repeated 2HS for the full length of the chain. This tatting forms a spiral along a chain.
Josephine Knot (JK): One half of the double stitch is used. Either the first half or the second half of the DS is repeated in a ring. Then the ring is closed. Before closing the ring, place the active shuttle inside the loop. This helps the JR to lie flat.
Some tatters like to begin the JR with one ds.
Lark’s Head Knot (LHK): This is the basic knot used in tatting. To form the DS the LHK is flipped. Flipped means that the HS loop which starts below the LHT is transferred above the LHT (core thread) when making the first and second half stitch.
Lock Join (LJ): a.k.a. shuttle join. Before making a shuttle join, snug up the DS against each other. With front side facing you, place the shuttle thread on top of the picot you wish to join. Insert crochet hook up through the bottom of the picot and pull down the shuttle thread to form a loop. Insert shuttle from ceiling to floor direction through the loop. Pull on one side of the loop until the loop is next to the old tatting. Hold the loop and previous tatting in a flat pinch while pulling on the shuttle thread. This should snug up the LJ so it mimics a DS. Continue tatting.
If the back side is facing you, then place the shuttle thread beneath the picot you wish to join. Insert crochet hook through the top of the picot and pull up the shuttle thread to form a loop. Insert shuttle from floor to ceiling through the loop. Snug up as stated above.
Lock Stitch (LS): First half stitch of the DS is not flipped (not transferred). The second half stitch of the DS is flipped.
Loop Over Connection (LOC): This is a technique to add a new thread to your work.
Ring: The loop-over connection (LOC) is a Lark’s Head knot without the flip. This is the same configuration for connecting baggage tags to luggage. Rather than to luggage, LOC is connected to the base of a ring.
How to make a LOC:
With the front side of ring facing you, place new thread over the top of the ring. Insert a crochet hook, from beneath the ring, and pull down the thread through the ring to form a loop. Hold the loop parallel with the floor. Insert shuttle, ceiling to floor, through the newly formed loop. Insert, ceiling to floor, the new thread tail. Grasp the shuttle thread and new thread tail and pull down. This should snug the loop up against the ring. It should look like a final stitch at the bottom of the ring. Tat over the tails.
Chain: Make the same loop-over connection (LOC) as a ring, except place it at the end of a chain. Additionally, place the old tail inside the LOC via the inside the loop created by the new shuttle thread as it was inserted to the Loop Over Connection. Snug up the LOC to last chain. Tat over tails.
Magic Thread Trick (MTT): This technique is used to hide the tails at the end of a tatted article. Thread a 6″ piece of fishing line through the bottom coil of a tiny safety pin. Tie the ends together. Make two.
At the end of the first ring or chain, insert the loop in the DS by tatting over the loop. (See Tat Over Tails.) Do this in the last 4-5 tatted stitches. Pin fishing line ends together to secure the loop. Before finishing the last element in a tatted article such as a chain, insert the 2nd loop by tatting over it with the last 4 or 5 DS. Do not tat too tightly over these loops or it will be difficult to pull through the thread tails.
After finishing tatting the article, cut the threads. Do the SLT with the threads. One thread will be pulled through one element (a ring or chain). Insert about ¼” of a tail through the fishing line loop and pull tail out the loop. The tail should go through the back of the chain or ring and come out. Pull tails up tight. Clip the tails close to the tatted article. Flatten the double stitches over any remaining tail end.
Mignonette Stitch: This type of tatting creates a net or mesh similar to the ground work of bobbin lace. Bare Thread Spaces are kept uniform by measuring each one with a ruler. The rows are connected by JK.
mignonette
 Mock Picot (MP)
: This can be made two ways. Leave a BTS (the size of other picots) at the end of split ring. With S1 begin tatting the first half of the split ring. Using S2 leave an small BTS equal to the first BTS. Then finish tatting the split ring.
Or you can leave a small BTS space, the same size as other picots. Then make a lock stitch to form a Mock Picot. The MP is followed by a split ring or chain for the new round.
I prefer “Mock Picot” to the term: false picot. What do you prefer and why? Let me know, I might change my mind, if you give me good reasons.
Mock Ring (MR): a.k.a. self-closing mock ring (SCMR). This uses a chain to create a ring.
Use two shuttles: Shuttle 1 (S1) and Shuttle 2 (S2). S2 will be the LHT or core thread. S1 is the active shuttle which makes the DS. Hold the threads the usual way to make a chain. Before beginning to tat, press down your middle finger to pull out a length of core thread. With your left index finger pinch this length of thread to make a loop. Tat a chain as normal, e.g., 10 ds. When you are finished, insert the active shuttle through the loop made by pressing down your middle finger. Pull shuttle thread to close the mock ring.
Needle Tatting: This refers to two techniques. Historically, an oversized needle was used to form the DS rather than a shuttle. This was practiced in the 19th century. Wrap the ball thread around your left hand just as you would for shuttle tatting. In your right hand, insert the needle using the under-over motion to form the Double Stitch.
The second method involves picking up the stitches with a modern tatting needle from your left hand. There is no under-over motion made by the right hand.
Cut a yard of thread. Thread the first few inches through the hole at the end of a tatting needle. This needle should be the same circumference (or a little smaller) as the thread you are using. After threading, hold the first part of the long length of thread against the needle with your right index finger.
1st Half Stitch
Further down, pick up the long thread and hold it with the last three fingers of the left hand. Wrap this thread clockwise around the pad of your left index finger. Insert the tatting needle beneath the thread held on the front of the index finger (just off to the side of the fingerprint pad). Pull thread until it lies snug against the needle. This is the 1HS.
2nd Half Stitch
Wrap the Ball Thread counterclockwise around your left index finger. Bend your index finger forward. The thread will lie across the top of your bent finger. Place the needle on the side of the thread which is opposite from your body. Insert the needle under the thread and pick it up off of your finger. Pull the thread until it lies snug against the needle. This is the 2HS.
An extra benefit of needle tatting is that you can use yarn or fluffy threads.
Open A Closed Ring: This technique is used to correct a mistake. There are several ways to open a closed ring
My preferred method is to pick out the last tatted DS. Then, at the picots, gently pull apart the double stitches. Use a crochet hook to pull up on the exposed core thread. Hold the doubles stitches on the core thread in a flat pinch. This is so they do not get too tight when you pull on the core thread. Continue alternating between pulling up the core thread and separating the double stitches until you have a large enough loop to pick out the offending stitches and replace them with normal DS.
Over Stitch (OS): The second half of the Double Stitch.
Picot (P): Picots may serve two functions: decorative or used for joining two elements. Picots are meant to imitate the picots made in needlepoint lace.
A picot is made by making a Double Stitch, leaving a Bare Thread Space, and making another DS. Push the two Doubles Stitches next to each other. The bare thread space will form a picot.
Picot Gauge: This tool is used to make uniform sized picots. Picot gauges can be homemade out of stiff cardboard, plastic from milk cartons, or matboard. Or they may be purchased at a tatting supply store. They may be made out of wood, plastic, or metal. Common measurements for a picot gauge are ⅛″, ¼”, ½”, ¾” and 1″. The height of a picot will be half of its width.
According to Georgia Seitz, you can measure picots in two ways: vertical or horizontal.
Vertical: Gauge should be at a vertical 90° angle in relation to the Left Hand Thread (LHT). The gauge will be placed between the LHT and the active shuttle thread. Hold picot gauge next to last DS. Make a new DS, then remove the gauge. Slide the new DS up against the old DS to form a picot. In this method, picots are made one at a time as the gauge is removed after each measured picot.
Horizontal: The picot gauge is held in a horizontal position. It lays on top of the completed double stitches. The LHT is lifted up, over, and behind the gauge. Make the new DS snug against the bottom of the gauge. Do not remove the gauge. Continue to tat until the next picot. Again, lift the LHT up, over, and behind the gauge. The horizontal position allows for several picots to be made in a row. When the ring or chain is ready to be tightened, then remove the gauge. This creates multiple picots of uniform size.
Also, you may use a ruler to measure a bare thread space.
Pinch: A pinch is formed when the left index finger and thumb hold an object(s) (e.g., thread). It holds (pinches) the LHT while the right hand makes the double stitch. By flatting the index finger over the thumb (a flat pinch), you can hold the pinch over the completed double stitches. This stabilizes the DS while a new DS is created. Covering each newly made stitch makes your tatting smooth and flat. To keep your work firm, snug up each new DS against the previous DS.
Reverse Work (RW): This means to flip your work to its opposite side in a top to bottom movement— the same way an oven door flips open.
Ring (R): This is a circle of double stitches. Rings are made with one thread, the active shuttle thread. The active shuttle thread is wound around the left hand and held in a pinch to create the LHT. Then the active shuttle makes the double stitches on the LHT. Pull the active shuttle thread to close the ring.
Reverse Order of Double Stitches (RODS): First, make the over stitch which is normally the second half of the DS. Next make the under stitch which is normally the first half of the DS. (These stitches are flipped.)
Rotate Work (Rtt): This is when you turn your work like a dial, i.e. 90°, 180°, etc. Do not flip work to its opposite side.
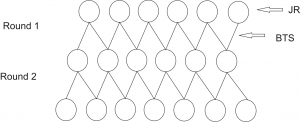
Round of tatting (Rnd): In patterns worked in concentric circles, the first round is the center circle. The second round surrounds the center circle and so on.
Row of tatting (Row): This occurs in linear patterns. If a tatting pattern was laid out like a cornfield, each row of corn would equal a row of tatting. When you de-tassel corn and reach the end of the row at the mile section, you turn around and work the next row of corn. Similarly, when you finish a row of tatting, or reach a particular section in a pattern, you turn your work to begin another row of tatting.
Shoelace Trick (SLT): This technique is used in several ways. It is used in needle tatting to close rings or chains. In shuttle tatting it is used if you are running out of thread on one shuttle, but have enough thread on a second shuttle. You can switch shuttles by making the first motion used to tie your shoelace: cross one shuttle thread over and bring it under the other shuttle thread. Tighten this half knot. Pick up the full shuttle to continue tatting.
Split Chain (S/Ch): Judi Banashek has excellent instructions in her Impeccable Tatting book for a split chain. She has given me permission to write about it.
Split Chain Instructions
Tat normally to place where you wish to split the chain. With the active shuttle, leave a Bare Thread Space (BTS) and make a Lock Join to the chain you wish to connect to. The BTS should be about one third shorter than the desired length of the chain because the BTS will stretch.
Step 1: Drop active shuttle thread on the backside of the BTS: insert a crochet hook from below BTS, hook the dropped thread, and pull downwards to form a loop. Insert left middle finger inside the loop to prevent it from twisting.
Step 2: Insert active shuttle through the front side of the loop. Gently, pull up thread, keeping the stitch very loose. This is the first half hitch.
Step 3: Drop the active shuttle thread on the front side of BTS: insert crochet hook, from ceiling to floor, through the inside (backside) of BTS. With a crochet hook, catch the dropped thread and pull it inside of the BTS and up toward the ceiling to create loop. (At the same time, this movement should flip the first half hitch.) Insert your finger through newly formed loop and pull up to tighten up the first HS.
Step 4: Insert the active shuttle through the back of the newly formed loop. Pull up on shuttle. This is the second half stitch of DS. Snug up this stitch next to the first half stitch.
Remember: Do not allow the thread to twist when making the loops.
Split Ring (S/R): a.k.a. as Climb Out Of a Ring through picot (COOR). This technique requires two shuttles. For a ring of 5-5, begin the ring like normal with S1. Tat 5 normal DS. Drop shuttle.
Turn your hand, palm facing up. Pick up S2. On the LHT, which lies across your palm, make 5 RODS. This means make the 2HS first, but do not let the HS flip. Just slide it up against the starting point of your normal DS. Next make the 1HS, but do not let this flip. Slide it up against the previous HS. Repeat this process four more times. This creates 5 LHK which are unflipped.
Take the LHT completely off of your hand and pull the S1 thread to close the ring. Make a MP. Then make another split ring to start the next round.
Square Knot (SqK): This knot is made with the same motion used in beginning to tie your shoe lace. Begin with one thread in your right hand and another thread in your left hand. Cross your right hand thread over and under the left hand thread. Then cross the left hand thread over and under the right hand thread. Hold the start and finish thread ends. Pull in opposite directions to tighten knot.
Starter Picot: Insert a paper clip or safety pin at the beginning of your work. Bring the first DS up tight against the paper clip to hold it in place. When it is time to join your tatting, remove the paper clip. There will be a small picot space for a join.
Switch Shuttles (SS): Put down the current shuttle you are using. Pick up the second shuttle. You have just switched shuttles.
This technique prevents twisting your threads as you work through your tatting pattern.
Tat Over Tails (TOT): This technique can be used to hide tail ends or to add new thread.
Tie two threads together. When making the first under stitch, use a crochet hook to pull down tails, from ceiling to floor, through the transferred loop. When making the first over stitch, use a crochet hook to pull tails up, from floor to ceiling, through the transferred loop.
The tails are hidden inside of the ds. Continue tatting in this manner for the first 5 to 6 stitches. Clip the tails hidden inside. Finish tatting.
Turn Work (TW): Turn your work to its opposite side like you would turn a page in a book.
Under Stitch (US): First half of the Double Stitch.
Very Small Picot (VSP): The sole purpose of this small picot is to stabilize elements of a motif. The hole in this picot should be no larger than the width of the thread you are using. (e.g., for size 10 thread, use 1/8” picot). When the join is completed, there should be no space between the thread in the center of the picot and the picot itself.
Weaver’s Knot: Use two threads A and B. With thread A make a slip knot. Insert thread B through the loop made by thread A. Tighten the slip knot over thread B.
Abbreviation KeyAdding Threads
Active Shuttle (AS)
Backside
Ball Thread (BT)
Bare Thread Space (BTS)
Bead (B)
Blade
Blocking
Cap
Chain (Ch)
Close (Cl)
Clover
Continuous Thread Method (CTM)
Double Stitch (DS)
Flawless Front (FF)
Flipped
Half Stitch (HS)
Join (J)
Josephine Chain (Spiral) (JC) or (JS)
Josephine Knot (JK)
Lark’s Head Knot (LHK)
Left Hand Thread (LHT)
Lock Join (LJ)
Lock Stitch (LS)
Loop Over Connection (LOC)
Magic Thread Trick (MTT)
Mignonette Stitch
Mock Picot (MP)
Mock Ring (MR)
Needle Tatting
Open A Closed Ring
Over Stitch (OS)
Picot (P)
Picot Gauge
Pinch
Reverse Work (RW)
Ring (R)
Reverse Order of Double Stitches (ROD)
Rotate Work (Rtt)
Round of tatting (Rnd)
Row of tatting (Row)
Shoelace Trick (SLT)
Split Chain (S/Ch)
Split Ring (S/R)
Square Knot (SqK)
Starter Picot
Switch Shuttles (SS)
Tat Over Tails (TOT)
Turn Work (TW)
Under Stitch (US)
Very Small Picot (VSP)
Weaver’s Knot
Additional Terms for Needle Tatting:CW: Clockwise Wrap
CCW: Counterclockwise Wrap
C&T: Cut and tie thread tails
NT: Needle Thread